Preventing Rogue Cookies with the Zillow Cookie Checker

When was the last time you took a look at your website’s cookies? Are there a lot? Where do they come from and which teams are controlling them? Could your website block third-party advertising cookies based on each user’s preference? With a large development team, it can be hard to keep track of all the places new cookies creep in.
Zillow started its cookie house-cleaning project in 2018. As a result of that work, Zillow upgraded its cookie preference banner in page footer, which allows each user to set their cookie preferences. If a user chooses to disable their functional/advertising cookies, corresponding cookies will not be generated on any Zillow pages.
This summer, an intern on our Adtech Product team built an automatic cookie scanning tool called Cookie Checker, so in the future if a team introduces a new cookie without logging it, Zillow is notified immediately.
Cookie Checker gives us an extra measure of assurance that no cookies have been added without first making them adhere to the user’s cookie preference. In this article we’ll explore how Zillow leverages AWS Lambda, Selenium, Python, and Chrome to implement our Cookie Checker.
The source of Zillow’s cookies could broadly be categorized into two groups:
Zillow maintains several pages, and we need to know what cookies are being generated on which pages, in order to verify that all these cookies are correctly blocked when a user chooses to block their advertising cookies. Most importantly, when developers introduce new cookies into a particular page that do not respect cookie blocking preferences, we want to be alerted immediately.
We could have achieved this goal by manually loading all Zillow pages and observing their cookies, but that is a tedious and unsustainable process. We also considered third party crawlers who provide a cookie scanning tool, but the resulting spreadsheet with several thousand entries failed to reveal which cookies came from where.
This summer, intern Ben Stuart, a brilliant student from University of Nebraska–Lincoln, started writing a tool to routinely scan Zillow’s most important pages leveraging Selenium, Chrome and AWS assets. After he finished most major functions our colleague Aditya helped optimize it and clean up all the bugs.
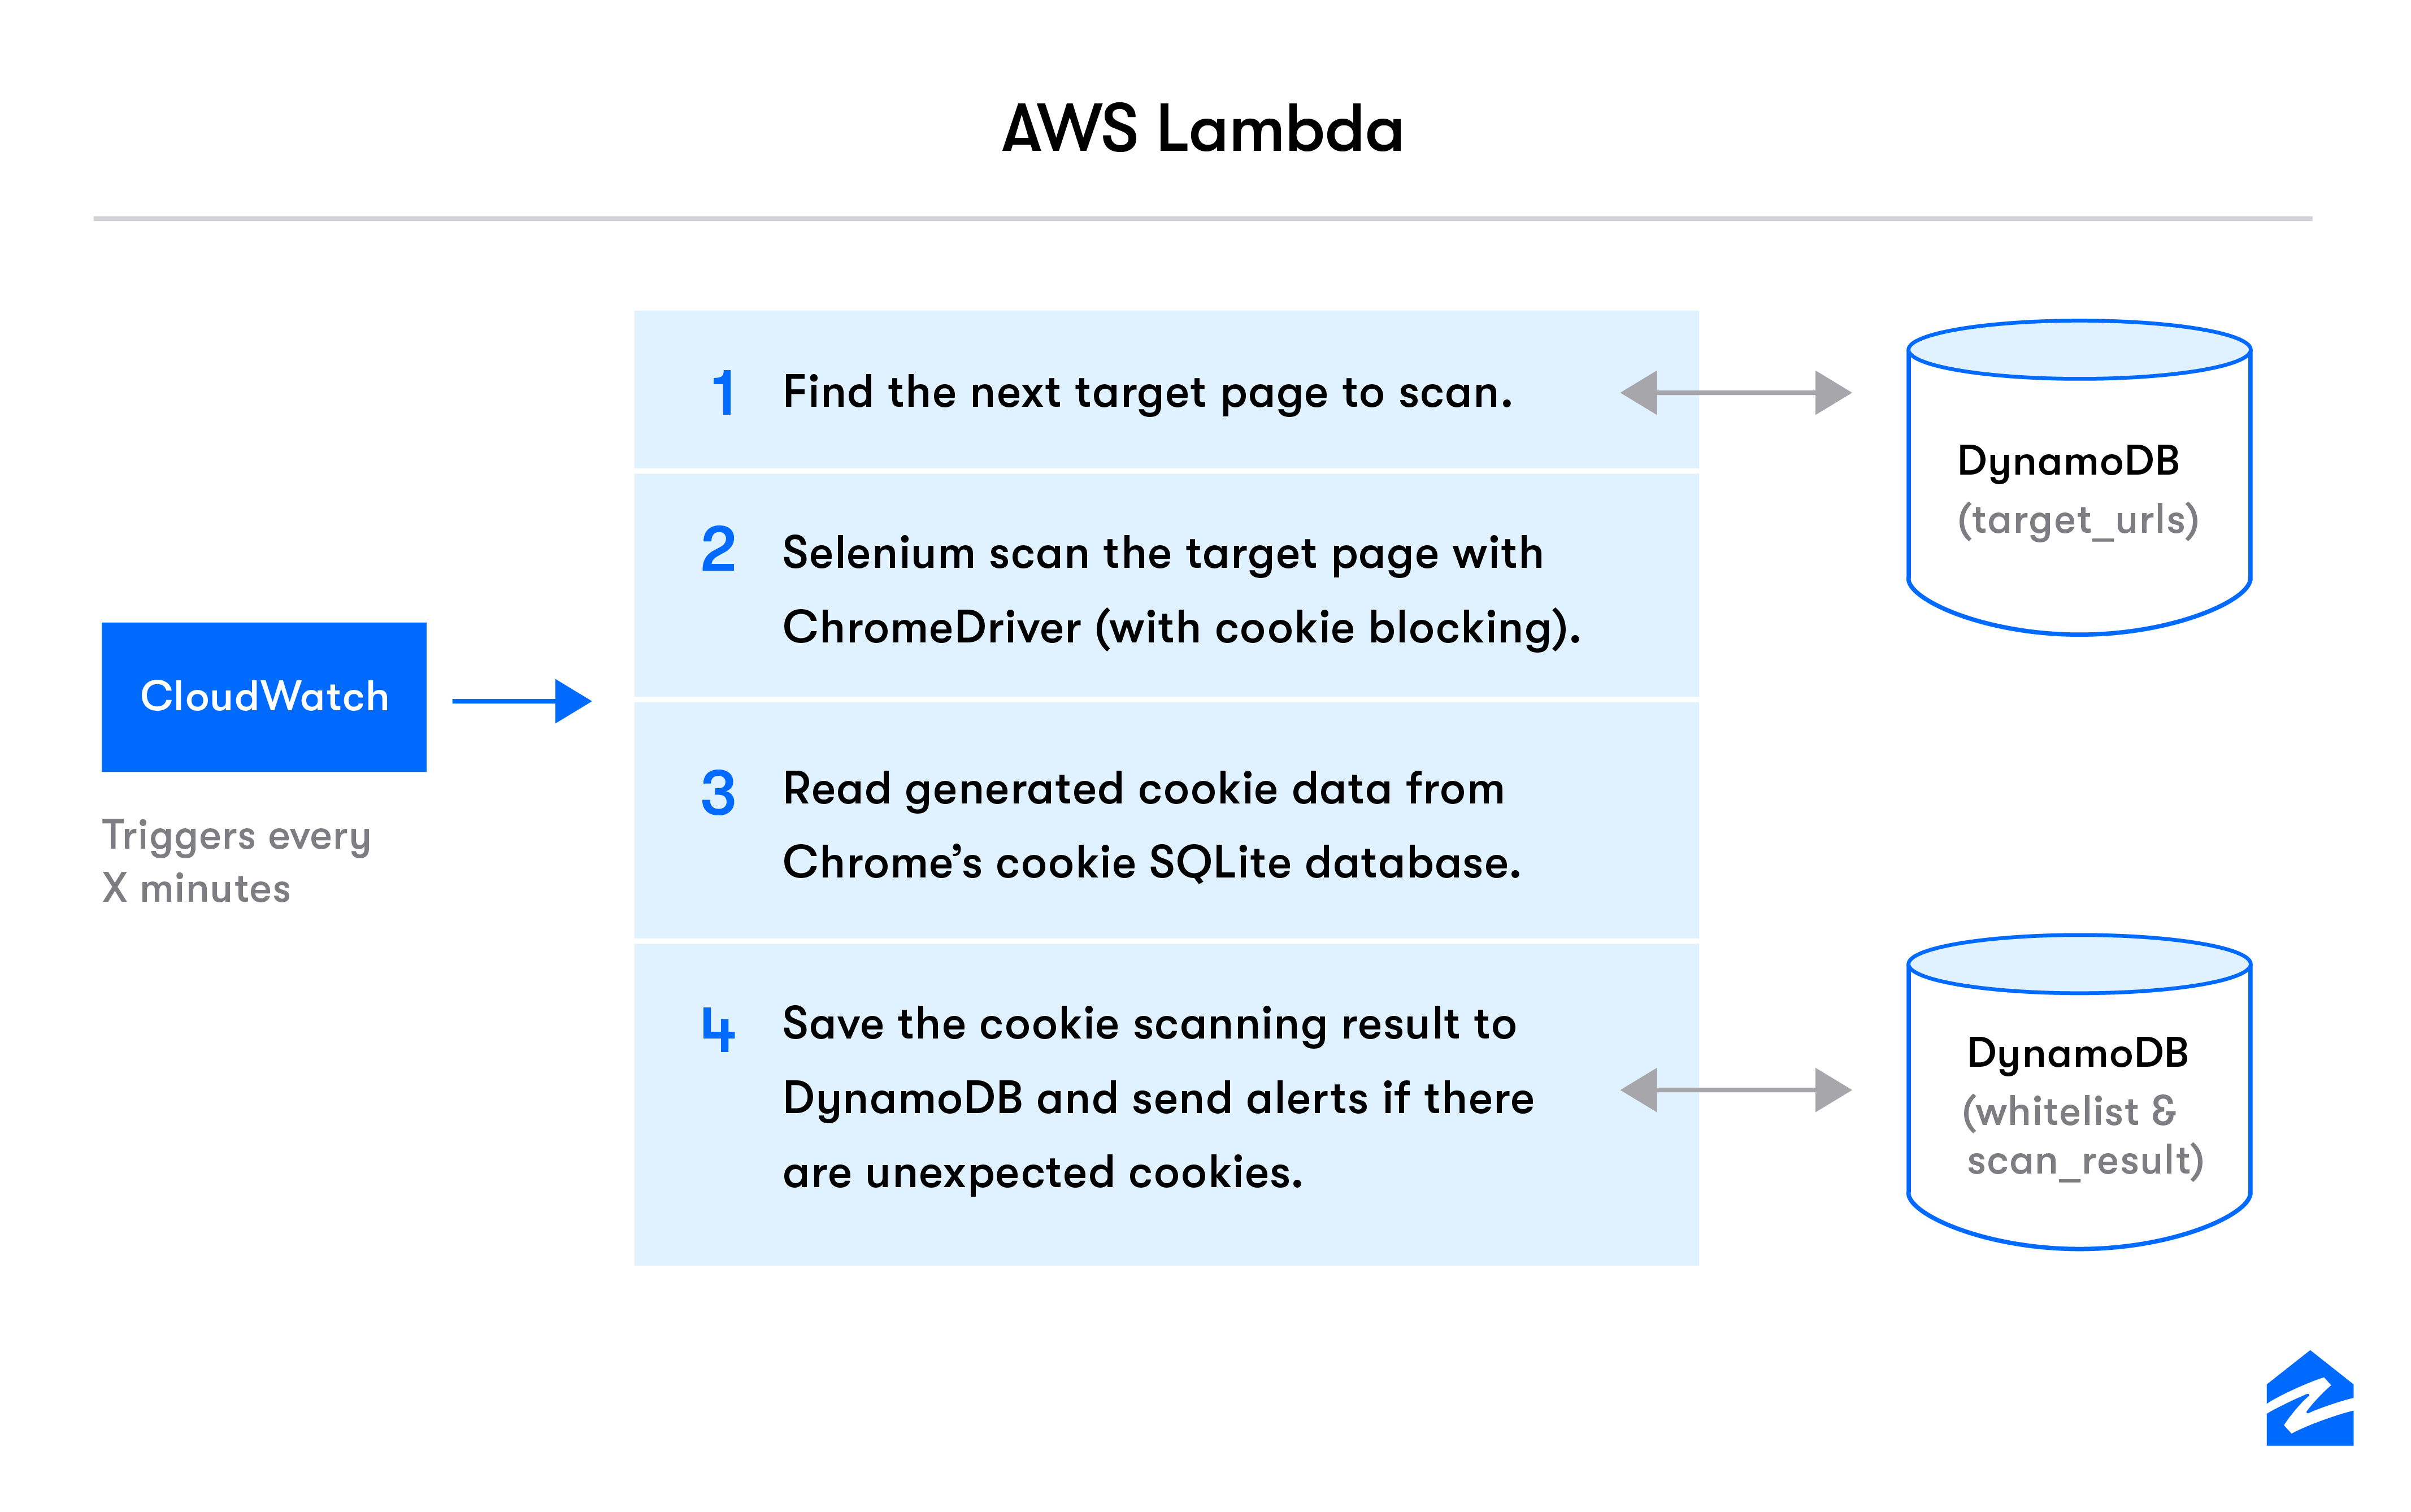
AWS Lambda attempts to scan a Zillow page every few minutes and process the cookies result. Given that the Lambda is a stateless system, how do we store which page should be scanned next? How do we know if we scanned it recently? How do we know what cookies are ok to have on these pages? We will answer some of these questions as we walk through the steps mentioned in the architecture diagram above.
As AWS Lambda kicks off, the first step is to identify which page to scan. Before we dive into how this is achieved, we should take a look at the AWS DynamoDB tables used to store the state on behalf of the Lambda. We use 3 tables in the AWS DynamoDB.
The Lambda can use a row in any of the tables mentioned above to store what was the index of the last scanned page from the target_urls. Once we fetch that information, it is easy to obtain the next page to be scanned. This allows us to abstract the state information away from the lambda, and know which page to scan next.
There are many things we can do when we set up tables to hold our state for the Lambda. For example, If the Lambda runs all day and you don’t need pages being scanned several times a day. This structure allows you to store a timestamp of last scan and use that information to prevent subsequent scans on a given day. (Wohoo!)
Once we’ve identified the page to be scanned, the next step is to actually scan it for cookies. In our case, we use the Selenium WebDriver to use Google Chrome to scan the pages in question.
driver = webdriver.Chrome(chromedriver_location, options=options)

driver.get("https://zillow.com")
At this point, we have loaded the page using the Selenium WebDriver, but we haven’t asked to block anything yet. We accomplish this by storing the cookie preference in a browser cookie called Optanon. But wait, we want to clear all the cookies that were set before we proceed, so let’s go ahead and do that too!
driver.delete_all_cookies()

driver.add_cookie(optanon_cookie)

// Optanon Cookie is a dictionary containing the keys commonly required in a cookie,

// Name, domain, expiry, sameSite and so on.
And then we visit the site again:
driver.get(“https://zillow.com”)
Now in the second visit, we only have the Optanon Cookie set which simulates the preference that we want to test out. We can obtain all the cookies that were set on the page by doing the following:
Cookies = driver.get_cookies()
Easy right? We thought so too, before discovering that Selenium driver doesn’t store the cookies that were set in a domain that is different from the site! This means the result won’t contain any cookie whose domain is not www.zillow.com. But that’s what we’re trying to scan for in the first place! So what can we do to make it work?
Remember the “options” variable in the very first code snippet to setup Selenium WebDriver? We haven’t talked about that! So let’s look at how it can change our implementation here. We can pass in an option called “–user-data-dir=/some/path/here” in the options array. So our options array would look like this:
options = [‘option1’, ‘option2’, ‘--user-data-dir=/some/path/here’, '--profile-directory=Default']

// Pass this onto the selenium code

driver = webdriver.Chrome(chromedriver_location, options=options)

driver.get("https://zillow.com")
What does this do and why did we pass it in the options?
Passing in the user-data-dir gives you control over where the Chrome instance is storing its local files. Recall we used the Selenium driver, but that invokes an instance of the Chrome browser. We are all aware that the browser stores cookies in some location on our system and this is the location the browser would use.
But why do we need this?
We’ve learned that the Selenium driver doesn’t store the cookies that are not the same domain as the site, but in our case, we use Selenium driver to create an instance of Google Chrome browser, that does the page scan for us. Google Chrome stores all the cookies somewhere in an SQLite DB file inside the user data directory.
Now we can read this file (Hurray!) to see what cookies were set in the browser when we visited our Zillow page (Neat, right?).
The Selenium webdriver uses Chrome to scan the target page and as a result, the cookies data live in a SQLite DB file. Now let’s figure out how to read it.
The cookie database, is simply a DB file in the –user-data-dir defined in the last step. In our example, its path will be “/some/path/here/Default/Cookies”. The relational database contains a table called cookies. Each resulting cookie will be a row in this table, and we can use SQL to query the cookies data.
However, there is one pitfall before you query this table. If you query this table immediately after the page scan, you will find the table contains no data. It turns out that it takes Chrome some time to write the cookies result into the table, so you have to wait for several seconds before reading the results. Putting things together, we will have the following code to read Chrome’s SQLite DB cookies table:
conn = sqlite3.connect(‘/some/path/here/Default/Cookies’)

cursor = conn.cursor()

time.sleep(75)

cursor.execute('SELECT * FROM cookies')

cookies = cursor.fetchall()

conn.close()
Once we extract the cookies data, we started to analyze each cookie’s content and decide whether they were expected. The cookies SQLite table contains rich data like cookie name, domain, value, expiration time, etc. You can also explore its schema using a sqlite3 command line tool
What we want to do is to ensure all the resulting cookies could be found in our company’s cookie whitelist. We would collect all those cookies that are not on the whitelist, and send the rogue cookies information in an alarm message via Opsgenie. We could also choose to store the result of each scan in DynamoDB for future reference.
Our intern Ben Stuart and his colleagues built the Cookie Checker tool to automatically check cookies generated on various Zillow pages and send alerts with rogue cookie data. The core AWS Lambda used Selenium webdriver to scan pages on a Chrome Instance. It then read the cookies result from the cookies SQLite DB, and compared the results against a static cookies whitelist. We updated the scanning state in seperate data source so that all Zillow’s target pages could be read in one day.
In the future we may expand this tool to scan other Zillow Group brands like Trulia and Hotpads, and we are exploring using Selenium to simulate a user’s different interactions with Zillow’s UI to make sure rogue cookies are not generated after a page load.
